DevExtreme jQuery/JS - Application Development
Whatever tools you choose, a process of creating a mobile application consists of the same steps. They are: application views design, view navigation planning, views implementation, data binding, debugging, testing and deploying. In this article, you will be guided to the solutions to be used at each step when using the DevExtreme SPA Framework. These solutions will help you build your apps easily.
Target Applications
First, ensure that the DevExtreme SPA framework meets your needs. This framework is developed for building the following types of mobile applications.
- Business applications, including those that support the BYOD concept.
- Mobile applications with a UI native to the target platform (according to the UI guidelines provided for this platform).
- Applications that are developed for functional purposes, rather than purely entertainment purposes.
- Applications that consist of several views with lists and forms.
Here are some examples of such applications:
Applications for getting services and placing an order
- Delivery services (pizza, sushi)
- Searching for nearby objects on a map (cash machines, bars, etc.)
- Booking services (accommodations, flight tickets, etc.)
Social networks
Automation of business processes that include data access from mobile devices.
- Applications for realtors, providing access to the current state of available real estate properties.
- Applications for taxi companies, to organize routes for available cars.
- Mobile dashboards, to provide the current state of sales/affairs/bugs.
- Mobile applications for surveys.
Mobile applications for data input and analysis
- A shopping list.
- Personal finance trackers.
- To-Do lists.
The following applications should not be built with the DevExtreme SPA Framework.
- Applications with a complex graphic interface.
- Applications dealing with binary data.
Prerequisites
The DevExtreme SPA framework is based on JavaScript, HTML5 and CSS3. When developing DevExtreme applications, you will only need to use JavaScript, HTML and CSS. In addition, you will need basic knowledge of Knockout and jQuery.
Optionally, you can use TypeScript when developing DevExtreme applications. The TypeScript definition files come with the DevExtreme package. Use the TypeScript-based Application Template to develop DevExtreme applications using TypeScript.
You need to reference Globalize only if your application should support the following functionality.
- Non-English locales
- Custom message dictionaries
- Non-USD currency formatting
- Custom date and number formatting
To learn more about how to use the Globalize library refer the Localization Using Globalize topic.
You can use any familiar code editor (e.g., Sublime Text) to develop DevExtreme applications, or you can use Visual Studio. In this instance, project templates, a design-time environment, a device simulator and wizards for easy application packaging are all available to you.
Application Planning
At this point, you know the main scenarios for using your resulting application. You are also aware of the tasks it will solve and the actions that will be available in it. Now, you need to decide what views (screens) are required in the application, how to distribute information between them and how end-users will navigate between the views. For this purpose, you will draw an informational application map. It will include the key views of the application, illustrate what information they present and indicate the navigation to other views.
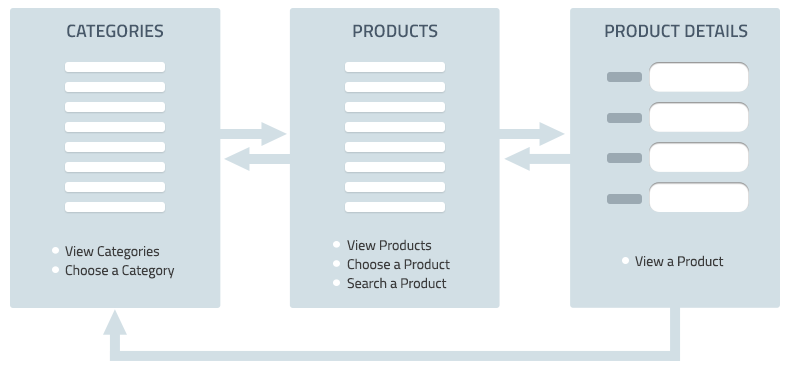
While drawing the application map, you may decide to make several views available from any application view. These views are called root views in the DevExtreme framework. The other views are not root views - end users can only navigate to them in a specific context. The total number of root views is important in deciding the type of global navigation to use. Here are several examples.
1 root view
You do not need global navigation. Instead, build a sequence of views where an end user can return to the previous view via the Back button.2-5 root views
Use a navigation bar as a global navigation control.A big count of root views
Use a slide-out menu as a navigation control.
When deciding on the type of the global navigation, take into account a set of predefined layouts that come with the framework. When using a predefined layout, a navigation control, together with a toolbar, will be added automatically; only the content within the view should be changed. Here is a list of available layouts.
- Simple Layout
- Navbar Layout
- Slideout Layout
- Pivot Layout (for Windows Phone apps)
- Split Layout (for Windows, iOS and Android tablets)
While root views are navigated using the navigation control, you are required to think about how to navigate to child views (views other than root views). The main point is that an end-user must be able to understand where he/she is located, regardless of where the end-user is located.
You will need to think about the functionality to be included in your app. Decide what actions you need on each view, including the contextual actions that are available when a particular view element is selected. Prioritize the view actions and make sure that system commands are not duplicated.
Read:
Check:
- Whatever navigation control you chose, do not use it together with another navigation control in your app.
- Use the guidelines provided for each platform if you are going to make a native-looking app.
- Minimize the number of modal views in your app. Use them only when it is absolutely necessary to get an end user's attention (read more).
Application Page
The applications created by this framework are single-page applications (SPA). This means that the application logic and markup are delivered to the client (web browser) on the first load. Then, data (in the form of JSON objects) can be loaded by request. This eliminates round-trips to the web server for page markup, thus allowing your app to be responsive.
While you can implement your application within one page, it is still better to factor out view HTML, JavaScript and CSS code into separate files and provide links to these files within the main application page. To help you get started quickly, the framework comes with an application project template.
Read:
Check:
- The DevExtreme JavaScript libraries (dx.mobile.js or dx.web.js) must be referenced below the external jQuery and Knockout libraries.
- dx-theme links must be used for linking predefined themes and these links must go before DevExpress scripts.
Views Implementation
Layouts
While drawing an application map, you discovered that your views have common elements such as a toolbar or navigation control. To save you from having to organize the same structure on each view and help you concentrate on changing content only, the framework supplies predefined layouts. Each layout is defined by a markup that includes placeholders for the view's changing content. To merge the layout markup with the markup of the view's changing content and display the result with a specified transition, a layout controller is implemented. In addition, there is a set of stylesheets used to present the layout markup on each platform in a unique way. You can find all these parts of each predefined layout in the ../Sources/Lib/layouts folder. All these predefined layouts are used within different layout sets. Set the application's layoutSet option to one of the predefined layout sets. In this instance, all your views will be displayed in frames of a particular layout from the set depending on the current context of the view display.
Read
Check
If possible, do not customize the markup of predefined layouts. But if you have to, remember to keep your modification when switching to a newer framework version.
You can create custom layouts and organize custom layout sets if required. In this instance, remember to cover your code by tests and check them when switching to a newer framework version by yourself.
View Design
When a layout set is specified, you have to define only the changing content for each view. The changing content will be called view here and everywhere in documentation.
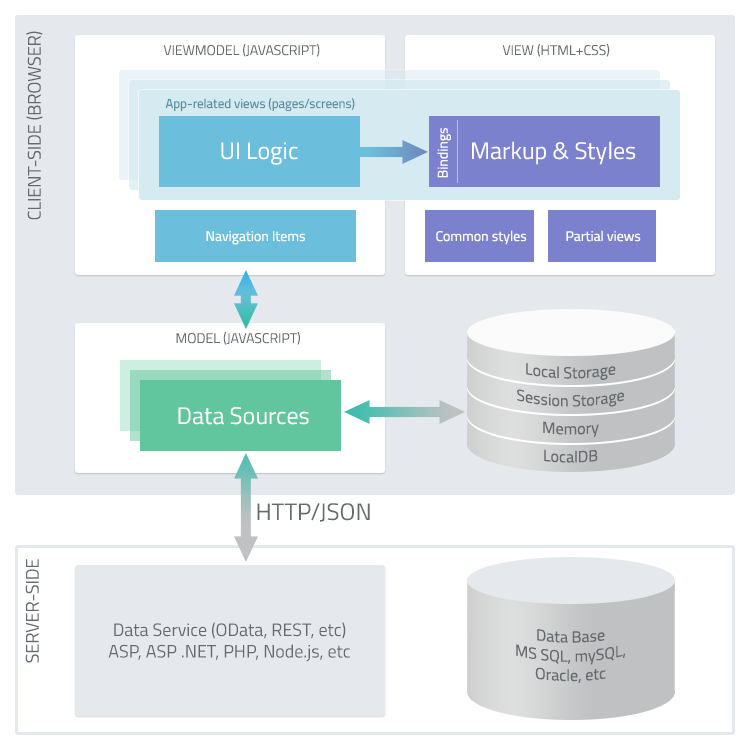
The framework follows the MVVM (Model-View-ViewModel) pattern. A Model is a JavaScript object that either represents data or receives data from a storage (local storage or remote server). A View is an HTML template with bindings and CSS rules. The ViewModel is a JavaScript object that prepares data for the View by adding new fields, calculating other ones or picking data from multiple Models. The scheme below will allow you to imagine the process of interaction between Views, ViewModels and Models.
Divide view implementation onto three steps. Start with a View. Prepare a markup that is rendered to a view that is very close to a planned view. Whether or not the result is visually pleasing is irrelevant at this point. The main task is to provide all required elements on the view. The result can be then given to a graphic designer, while you work under the ViewModel and Model for this view.
Read
Widgets
DevExtreme comes with an extensive list of UI and Visualization widgets. These widgets are stylized in your application according to the stylesheets of the theme applied to the application. Use these widgets in your application created using the DevExtreme SPA framework.
DevExtreme widgets can be created using the Knockout, jQuery or AngularJS approach. However, we recommend that you use the Knockout approach in the applications created using the DevExtreme SPA framework, since this framework is based on the Knockout template engine.
Read
Check
- Do not mix the jQuery and Knockout approaches when working with DevExtreme widgets. In particular, do not use Knockout bindings in widgets created using the jQuery approach.
- Do not use the DeferRendering widget on simple static views. This widget is helpful in complex views.
- Do not use the LoadPanel to indicate a loading or refreshing state. Instead, use the DeferRendering widget with an enabled loading indicator.
Navigation
The framework's runtime takes care of navigation between views. You just specify the URL to which the framework navigates, defining routing rules beforehand. When a view is navigated to and rendered, it is made visible using specified animation or transition.
You can call the navigate() method of the HtmlApplication object from everywhere to navigate to an application view. In addition, DevExtreme widgets and commands have configuration options that take on a string or an object defining the view to navigate to. You can also bind any HTML element with an action that will navigate to the specified view. The string or object that defines the view to navigate to must respond to the application's routing format. The routing format can be specified so that it is possible to pass parameters when navigating to a view.
While an end user navigates from one view to another, the framework's navigation manager keeps a history of displayed views. In applications indicated as a 'mobile' application, information on navigated views is saved to navigation stacks.

You can organize navigation to a view deeper in a navigation stack or return back within a stack. In addition, you can organize navigation to another navigation stack (based on another root view).
To provide backwards navigation, either a Back button is added automatically or a hardware Back button is activated (on Windows Phone devices). The Back button navigates to a previous view in the current navigation stack with animation that is opposite to the one that was used before.
In applications marked as a 'website', browser history is used by the navigation system instead of building navigation stacks. Each navigated view is added next to the previous view in the navigation history.
Read
- Navigation Routing Format
- Navigate to a View
- navigate()
- dxAction
- Navigation History in Mobile Apps
- Navigate Back in Mobile Apps
- Navigation in Web Apps
Check
- Application navigation should be organized so that an end-user always understands where he/she is located in the application and how to return back to a view.
- The Back button is automatically added where it is needed. If you want to hide it where it is added or show it where it is not added, there is something wrong in the design of your application.
- Do not change the transition animation direction of the automatically added Back button.
- The Back button must not appear on root views, since a root view is the very beginning of the navigation stack.
- When using the predefined SlideOut layout, root views contain the Menu button on a toolbar. This button shows/hides a global navigation menu. Child views have the Back button on the place of the Menu button. To access the global navigation menu, use the "slide" gesture. Do not change this behavior.
- Use the DevExreme dxAction binding to specify a URL to which to navigate when clicking an HTML element, instead of the using the standard href="#url" attribute.
Toolbar Buttons
The layouts that are supplied with the framework include the Toolbar widget. For each toolbar, a command container is defined using the data-options attribute set to dxCommandContainer. A command container has an identifier specified. You can define a command and map it to the required command container. All the commands that are mapped to a certain command container will be displayed as toolbar buttons or as items in the toolbar's overflow menu. To specify a function that must be performed when clicking the button, a text and an icon for the button, specify the corresponding command configuration options.
Read
Check
- Do not add buttons to a toolbar directly. Use commands instead.
Icons
Both the command buttons and widgets that you add to your application can be displayed with icons. The framework comes with an Icon Library, which contains many frequently used icons. Each icon is appropriate for a specific theme and has a particular look in that theme. To allow you to easily utilize an icon from the Icon Library, commands and widgets expose the icon option within their configuration object. This option takes on an icon name.
You can extend the Icon library. In addition, you can use custom icons by assigning a file path to the icon option.
Read
ViewModel
The ViewModel is a JavaScript object that prepares data for the View by adding new fields, calculating other ones or picking data from multiple Models. In a DevExtreme application template, ViewModels are implemented in separate files that are linked in the application page. In these files, there is a function that has the same name as the View template. This function returns the ViewModel object.
ViewModel objects can be used to handle the application's view-related events.
Read
Check
- Do not use global bindings.
- Do not access a markup from ViewModels. Instead, process a view markup on the viewRendered event.
- Do not use the viewShowing event to perform any "heavy" work. If possible, avoid using this event at all.
- Start loading data for a view on the viewShown event.
- Use a TDD approach when implementing ViewModels.
Model
A Model is a JavaScript object that either represents data or receives data from a storage (local storage or remote server). In DevExtreme applications, you can use the DataSource and Store objects to read and write data from local and remote data storages. The DataSource is a stateful object that keeps sorting, grouping, filtering, and keeps data transformation options and applies them each time data is loaded. It also provides events intended to handle changing data and the state. A Store is a stateless object implementing a universal interface for reading and modifying data. Each Store contains the same set of methods. So you can use the same code to operate with different data storages. The DevExtreme widgets provide many capabilities for their easy use when they are bound to the DevExtreme DataSource.
Read
Running
As an HTML-JavaScript application, a DevExtreme application is run by a browser.
Check:
- Use the browsers that are supported by the framework. See Supported Browsers.
- All required themes must be referenced within the application page. See Supplied Themes.
Launching an App Manually
To run an application locally, use any web server (Apache HTTP Server, IIS or any other).
To see how your application looks and behaves on different devices, use one of the following options.
When your application is running in a browser, choose the required browser using the user agent switcher that is built into the browser.
In the index.js file of your application project, set the target device using the devExpress.devices.current(deviceName) function before the HtmlApplication object creation. In this instance, the application will run in your browser with the theme corresponding to the device you specified. This approach is helpful when testing URLs that are generated during navigation between views.
Use third-party device simulators, such as Ripple or PhoneGap Emulator.
Launching an App in Visual Studio
The mobile applications that are built in Visual Studio with a DevExtreme project template can be run using one of the following techniques.
In a device simulator
DevExtreme comes with a simulator that allows you to see how your application looks and behaves on different devices.In a mobile browser
You can scan the QR code provided by the simulator to run the application on a device in a mobile browser.On a device as a native application
Download the DevExtreme Courier application from GooglePlay or iTunes using your device. Use this application to run your DevExtreme application. This allows you to see how the application looks and behaves when it is running as a native application.
Read:
Debugging
All browsers hide errors from end users. To inspect HTML elements and debug JavaScript errors in your application, use the browser's developer tools. Here are the links where you will learn how to install and use them.
To debug KnockoutJS bindings, use the KnockoutJS context debugger.
Read:
Deployment
Applications built using the DevExtreme SPA framework can be deployed to any device after being packed as a mobile application, as well as be deployed as an ordinary web application or a WinJS application.
Deploy as a Native Mobile App
DevExtreme applications are ready to be compiled by Apache Cordova (PhoneGap) into a native package that can then be submitted to app stores. If you follow this route, PhoneGap also provides libraries to access a device's built-in functionality such as camera, accelerometer and contact list.
Manually
To build a package for your application, do the following.
Add the config.xml file to the application project according to the PhoneGap Build instructions.
Pack your project content to a ZIP archive.
Follow the instructions provided by PhoneGap Build to get a native package for your application.
Using the Wizard in Visual Studio
DevExtreme comes with the Build Native Package wizard integrated into Visual Studio. This wizard helps produce a native package for the following platforms: iOS, Android and WindowsPhone. You can also use the wizard to get a ZIP archive that is ready to be compiled by Apache Cordova (PhoneGap Build). To learn more on how to use the Build Native Package wizard, refer to the Packaging Tools article.
Deploy as a Web App
Since an application built using the DevExtreme SPA framework is a static web page, you can deploy it as an ordinary web page with the referenced files.
Manually
To deploy a DevExtreme project to a web server, copy the project content manually. As an example, the following steps will help you deploy a DevExtreme application to IIS.
Add the contents of your DevExtreme application project or the output folder of your DevExtreme project to the deployed project folder.
In the IIS Manager, add a connection to the application that is now contained in the deployed project folder.
Ensure that the index.html file (or other file that serves as the main page in the application such as app.html) is contained in the list of default documents. To do this, select your project in the Connections list and open the Default Document list. Add a file corresponding to your main page to the list, if there is none.
If you deploy an application created using a DevExtreme project template, there are files with the .dxview extension in the project. Add this type to the list of MIME types. For this purpose, select your project in the Connections list and open the MIME Types Page. Right-click the page and choose Add.... Specify .dxView as the file extension name and text/html as the MIME type. Click OK.
The application is now ready to be run in a browser by typing the required URL (the one that you specified for your application in the IIS Manager) in the browser's address bar.
Using the Dialog in Visual Studio
DevExtreme comes with the Link to... Visual Studio dialog. This dialog adds files from the DevExtreme project to another specified project as links (as if you added these files as links one by another using the Visual Studio Add | Existing item... dialog). This allows you to "link" a DevExtreme project to another web project (e.g., an ASP.NET project) once and to deploy the "parent" web project using standard Visual Studio procedures when required. To learn more on how to use the Link to... Visual Studio dialog, refer to the Linking DevExtreme Projects article.
At the same time, you can deploy a DevExtreme application to a web server by copying project content ("\bin\Debug" or "\bin\Release") manually, as described above, if "linking" to another web project does not suite your needs.
Deploy as a WinJS App
To deploy an application built using the DevExtreme SPA framework as a WinJS app, use the Multi-Channel Application project template and choose Win as a target platform in the DevExtreme Project Wizard. The solution created using this template will include the Shared project for developing a DevExtreme application and the Win project for deploying the DevExtreme application as a WinJS app. You can use standard deployment procedures provided for the Win project in Visual Studio. Since the Shared project is linked to the Win project, the resulting application will be the DevExtreme application deployed as a WinJS app.
If you do not use the Multi-Channel Application application template, but have a DevExtreme application project designed in Visual Studio, you can still deploy it as a WinJS app. For this purpose, add a standard Win project to your solution and link the DevExtreme project to the Win project.

 Select one or more answers