JavaScript/jQuery PivotGrid - Getting Started
DevExtreme includes multiple data management components. You can use them to display tabular, hierarchical, multidimensional data, or present information as cards. For more information about these components and their features, see How to Choose a Data Management Component.
jQuery
Angular
Vue
React
The PivotGrid component allows you to display and analyze multi-dimensional data from local storage or OLAP cube.
Need to create printable documents simply? Try our .NET-based DevExpress Reports: they ship with an intuitive Visual Studio Report Designer, Web Report Designer for end-user ad-hoc reporting, and a rich set of report controls, including cross tabs and charts.
You can generate a variety of report types — from simple mail-merge, table, and vertical reports to master-detail (hierarchical) and cross-tab reports, print or export them to PDF, Excel, and other formats.
Develop using VS Code? Leverage the capabilities of a brand new VS Code Report Designer extension to create and edit reports/documents on any platform, be it Windows, macOS, or Linux.
This tutorial shows how to add the PivotGrid component to a page, bind the component to data, and configure its core features. The following control demonstrates the result:
Each section in this tutorial covers a single configuration step. You can also find the full code in the following GitHub repository: Getting Started with DevExtreme PivotGrid.
Create a PivotGrid
jQuery
Add DevExtreme to your jQuery application and use the following code to create a PivotGrid:
$(function() {
    $("#pivotGrid").dxPivotGrid({
        // Configuration goes here
    });
});
<html>
    <head>
        <!-- ... -->
        <script type="text/javascript" src="https://code.jquery.com/jquery-3.5.1.min.js"></script>

        <link rel="stylesheet" href="https://cdn3.devexpress.com/jslib/25.2.4/css/dx.light.css">
        <link rel="stylesheet" href="index.css">

        <script type="text/javascript" src="https://cdn3.devexpress.com/jslib/25.2.4/js/dx.all.js"></script>
        <script type="text/javascript" src="index.js"></script>
    </head>
    <body class="dx-viewport">
        <div id="pivotGrid"></div>
    </body>
</html>
#pivotGrid {
    height: 70vh;
}
Angular
Add DevExtreme to your Angular application and use the following code to create a PivotGrid:
<dx-pivot-grid id="pivotGrid">
    <!-- Configuration goes here -->
</dx-pivot-grid>
import { Component } from '@angular/core';

@Component({
    selector: 'app-root',
    templateUrl: './app.component.html',
    styleUrls: ['./app.component.css']
})
export class AppComponent {

}
import { BrowserModule } from '@angular/platform-browser';
import { NgModule } from '@angular/core';
import { AppComponent } from './app.component';

import { DxPivotGridModule } from 'devextreme-angular';

@NgModule({
    declarations: [
        AppComponent
    ],
    imports: [
        BrowserModule,
        DxPivotGridModule
    ],
    providers: [ ],
    bootstrap: [AppComponent]
})
export class AppModule { }
#pivotGrid {
    height: 70vh;
}
Vue
Add DevExtreme to your Vue application and use the following code to create a PivotGrid:
<template>
    <DxPivotGrid id="pivotGrid">
        <!-- Configuration goes here -->
    </DxPivotGrid>
</template>

<script>
import 'devextreme/dist/css/dx.light.css';

import { DxPivotGrid } from 'devextreme-vue/pivot-grid';

export default {
    components: {
        DxPivotGrid
    }
}
</script>

<style>
#pivotGrid {
    height: 70vh;
}
</style>
React
Add DevExtreme to your React application and use the following code to create a PivotGrid:
import 'devextreme/dist/css/dx.light.css';
import './App.css';

import {
    PivotGrid
} from 'devextreme-react/pivot-grid';

function App() {
    return (
        <PivotGrid id="pivotGrid">
            {/* Configuration goes here */}
        </PivotGrid>
    );
}

export default App;
#pivotGrid {
    height: 70vh;
}
Bind the PivotGrid to Data
The PivotGrid component can work with data from local arrays, OLAP services (Microsoft SQL Server Analysis Services), and other data sources. Regardless of the data source type, use the dataSource property to bind the PivotGrid to data. This property accepts a PivotGridDataSource instance or configuration object.
PivotGridDataSource allows you to process data before the PivotGrid displays it. PivotGridDataSource contains a store that encapsulates data access logic. Different store types should be used with different data source types.
In this tutorial, we use the XmlaStore to bind the PivotGrid to an OLAP service. To configure the XmlaStore, specify the OLAP service's url, the catalog that contains the OLAP cube to use, and the name of the cube. The following code binds the PivotGrid to a sample OLAP service:
jQuery
$(function() {
    $("#pivotGrid").dxPivotGrid({
        dataSource: {
            store: {
                type: "xmla",
                url: "https://demos.devexpress.com/Services/OLAP/msmdpump.dll",
                catalog: "Adventure Works DW Standard Edition",
                cube: "Adventure Works"
            }
        },
    });
});
Angular
import { Injectable } from '@angular/core';
import PivotGridDataSource from 'devextreme/ui/pivot_grid/data_source';

const dataSource = new PivotGridDataSource({
    store: {
        type: "xmla",
        url: "https://demos.devexpress.com/Services/OLAP/msmdpump.dll",
        catalog: "Adventure Works DW Standard Edition",
        cube: "Adventure Works"
    }
});

@Injectable({
    providedIn: 'root'
})
export class AdventureWorksService {
    getPivotGridDataSource(): PivotGridDataSource {
        return dataSource;
    }
}

export { PivotGridDataSource }
<dx-pivot-grid
    [dataSource]="dataSource">
</dx-pivot-grid>
import { Component } from '@angular/core';
import { AdventureWorksService, PivotGridDataSource } from './adventureworks.service';

@Component({
    selector: 'app-root',
    templateUrl: './app.component.html',
    styleUrls: ['./app.component.css']
})
export class AppComponent {
    dataSource: PivotGridDataSource;
    constructor(service: AdventureWorksService) {
        this.dataSource = service.getPivotGridDataSource();
    }
}
Vue
import PivotGridDataSource from 'devextreme/ui/pivot_grid/data_source';

const dataSource = new PivotGridDataSource({
    store: {
        type: "xmla",
        url: "https://demos.devexpress.com/Services/OLAP/msmdpump.dll",
        catalog: "Adventure Works DW Standard Edition",
        cube: "Adventure Works"
    }
});

export default {
    getPivotGridDataSource() {
        return dataSource;
    }
}
<template>
    <DxPivotGrid
        :data-source="dataSource">
    </DxPivotGrid>
</template>

<script>
import 'devextreme/dist/css/dx.light.css';

import { DxPivotGrid } from 'devextreme-vue/pivot-grid';
import AdventureWorksService from './adventureworks.service';

export default {
    components: {
        DxPivotGrid
    },
    data() {
        return {
            dataSource: AdventureWorksService.getPivotGridDataSource()
        }
    }
}
</script>
React
import PivotGridDataSource from 'devextreme/ui/pivot_grid/data_source';

const dataSource = new PivotGridDataSource({
    store: {
        type: "xmla",
        url: "https://demos.devexpress.com/Services/OLAP/msmdpump.dll",
        catalog: "Adventure Works DW Standard Edition",
        cube: "Adventure Works"
    }
});

export default {
    getPivotGridDataSource() {
        return dataSource;
    }
}
import 'devextreme/dist/css/dx.light.css';

import AdventureWorksService from './adventureworks.service';
import { PivotGrid } from 'devextreme-react/pivot-grid';

const dataSource = AdventureWorksService.getPivotGridDataSource();

export default function App() {
    return (
        <PivotGrid
            dataSource={dataSource}>
        </PivotGrid>
    );
}
If you want to bind the PivotGrid to other data source types, refer to the following demos for more information:
Configure Fields and Areas
To display data in the PivotGrid, specify the fields[] array. Each object in it configures a single pivot grid field. Specify the dataField property to populate the pivot grid field with data.
You can distribute fields between four different areas: row, column, filter, and data. Row and column fields contain values displayed in row and column headers. Filter fields are invisible, but users can filter data against them. Data fields contain values for summary calculation. To specify the area, set the area property. In the following code, we declare two row fields, two column fields, and two data fields:
jQuery
$(function() {
    $("#pivotGrid").dxPivotGrid({
        dataSource: {
            // ...
            fields: [{
                dataField: "[Product].[Category]",
                area: "row"
            }, {
                dataField: "[Product].[Subcategory]",
                area: "row"
            }, {
                dataField: "[Ship Date].[Calendar Year]",
                area: "column"
            }, {
                dataField: "[Ship Date].[Month of Year]",
                area: "column"
            }, {
                dataField: "[Measures].[Sales Amount]",
                area: "data",
                format: "currency"
            }, {
                dataField: "[Measures].[Tax Amount]",
                area: "data",
                format: "currency"
            }],
        },
    });
});
Angular
// ...
import PivotGridDataSource from 'devextreme/ui/pivot_grid/data_source';

const dataSource = new PivotGridDataSource({
    // ...
    fields: [{
        dataField: "[Product].[Category]",
        area: "row"
    }, {
        dataField: "[Product].[Subcategory]",
        area: "row"
    }, {
        dataField: "[Ship Date].[Calendar Year]",
        area: "column"
    }, {
        dataField: "[Ship Date].[Month of Year]",
        area: "column"
    }, {
        dataField: "[Measures].[Sales Amount]",
        area: "data",
        format: "currency"
    }, {
        dataField: "[Measures].[Tax Amount]",
        area: "data",
        format: "currency"
    }]
});

// ...
Vue
import PivotGridDataSource from 'devextreme/ui/pivot_grid/data_source';

const dataSource = new PivotGridDataSource({
    // ...
    fields: [{
        dataField: "[Product].[Category]",
        area: "row"
    }, {
        dataField: "[Product].[Subcategory]",
        area: "row"
    }, {
        dataField: "[Ship Date].[Calendar Year]",
        area: "column"
    }, {
        dataField: "[Ship Date].[Month of Year]",
        area: "column"
    }, {
        dataField: "[Measures].[Sales Amount]",
        area: "data",
        format: "currency"
    }, {
        dataField: "[Measures].[Tax Amount]",
        area: "data",
        format: "currency"
    }]
});

// ...
React
import PivotGridDataSource from 'devextreme/ui/pivot_grid/data_source';

const dataSource = new PivotGridDataSource({
    // ...
    fields: [{
        dataField: "[Product].[Category]",
        area: "row"
    }, {
        dataField: "[Product].[Subcategory]",
        area: "row"
    }, {
        dataField: "[Ship Date].[Calendar Year]",
        area: "column"
    }, {
        dataField: "[Ship Date].[Month of Year]",
        area: "column"
    }, {
        dataField: "[Measures].[Sales Amount]",
        area: "data",
        format: "currency"
    }, {
        dataField: "[Measures].[Tax Amount]",
        area: "data",
        format: "currency"
    }]
});

// ...
Display the Field Panel
A field panel is an element that displays pivot grid fields involved in summary calculation. This panel consists of the same four field areas: column, row, data, and filter. Users can drag and drop fields between these areas.
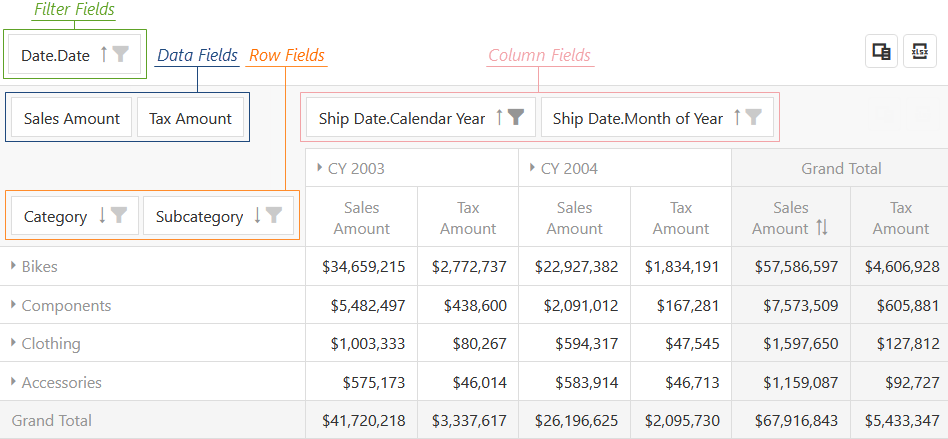
To display the field panel, enable the fieldPanel.visible property. Use other fieldPanel properties to configure optional features. For example, you can hide the filter field area:
jQuery
$(function() {
    $("#pivotGrid").dxPivotGrid({
        // ...
        fieldPanel: {
            visible: true,
            showFilterFields: false
        },
    });
});
Angular
<dx-pivot-grid ... >
    <dxo-pivot-grid-field-panel
        [visible]="true"
        [showFilterFields]="false">
    </dxo-pivot-grid-field-panel>
</dx-pivot-grid>
Vue
<template>
    <DxPivotGrid ... >
        <DxFieldPanel
            :visible="true"
            :show-filter-fields="false"
        />
    </DxPivotGrid>
</template>

<script>
// ...
import {
    // ...
    DxFieldPanel
} from 'devextreme-vue/pivot-grid';

export default {
    components: {
        // ...
        DxFieldPanel
    },
    // ...
}
</script>
React
// ...
import {
    // ...
    FieldPanel
} from 'devextreme-react/pivot-grid';

// ...
export default function App() {
    return (
        <PivotGrid ... >
            <FieldPanel
                visible={true}
                showFilterFields={false}
            />
        </PivotGrid>
    );
}Configure the Field Chooser
The field chooser allows users to manage pivot grid fields. Its window displays five field sections, four of which correspond to pivot grid areas and the fifth contains all fields. Users can drag and drop fields between these sections.
To open the field chooser, users should click the Field Chooser icon or select Show Field Chooser from a row or column header's context menu.
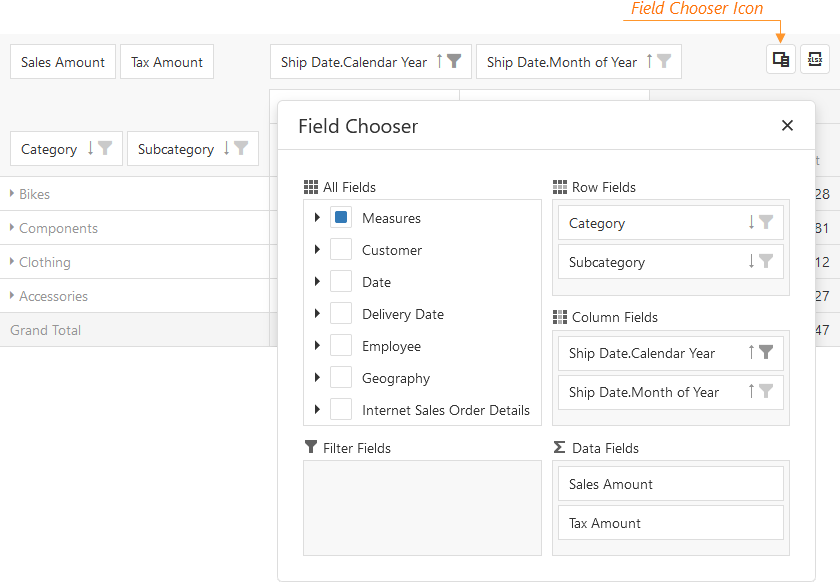
To configure the field chooser, declare the fieldChooser object. Use the enabled property to specify whether the Field Chooser icon and the corresponding context menu command are available. This property's default value is true.
The All Fields section includes the fields declared in the fields[] array and the fields auto-generated from the data source model. If the All Fields section contains a large number of fields that users find hard to navigate through, you can disable the dataSource.retrieveFields property to hide the auto-generated fields. Alternatively, you can enable the allowSearch property to allow users to search in the All Fields section.
jQuery
$(function() {
    $("#pivotGrid").dxPivotGrid({
        // ...
        dataSource: {
            // ...
            // retrieveFields: false
        },
        fieldChooser: {
            allowSearch: true
        },
    });
});
Angular
// ...
import PivotGridDataSource from 'devextreme/ui/pivot_grid/data_source';

const dataSource = new PivotGridDataSource({
    // ...
    // retrieveFields: false
});

// ...
<dx-pivot-grid ... >
    <dxo-pivot-grid-field-chooser
        [allowSearch]="true">
    </dxo-pivot-grid-field-chooser>
</dx-pivot-grid>
Vue
import PivotGridDataSource from 'devextreme/ui/pivot_grid/data_source';

const dataSource = new PivotGridDataSource({
    // ...
    // retrieveFields: false
});

// ...
<template>
    <DxPivotGrid ... >
        <DxFieldChooser :allow-search="true" />
    </DxPivotGrid>
</template>

<script>
// ...
import {
    // ...
    DxFieldChooser
} from 'devextreme-vue/pivot-grid';

export default {
    components: {
        // ...
        DxFieldChooser
    },
    // ...
}
</script>
React
import PivotGridDataSource from 'devextreme/ui/pivot_grid/data_source';

const dataSource = new PivotGridDataSource({
    // ...
    // retrieveFields: false
});

// ...
// ...
import {
    // ...
    FieldChooser
} from 'devextreme-react/pivot-grid';

const dataSource = AdventureWorksService.getPivotGridDataSource();

export default function App() {
    return (
        <PivotGrid ... >
            <FieldChooser
                allowSearch={true}
            />
        </PivotGrid>
    );
}
DevExtreme also includes a standalone PivotGridFieldChooser component. Unlike the field chooser integrated into the PivotGrid, the standalone field chooser can remain visible on a page at all times. Refer to the following demos for more information on both field choosers:
Sort Data
PivotGrid allows you and end users to sort field values by summary values or alphabetically.
Sort Field Values Alphabetically
To sort field values in alphabetical order, users should click a field in the field panel or field chooser. An arrow icon indicates the sort order.
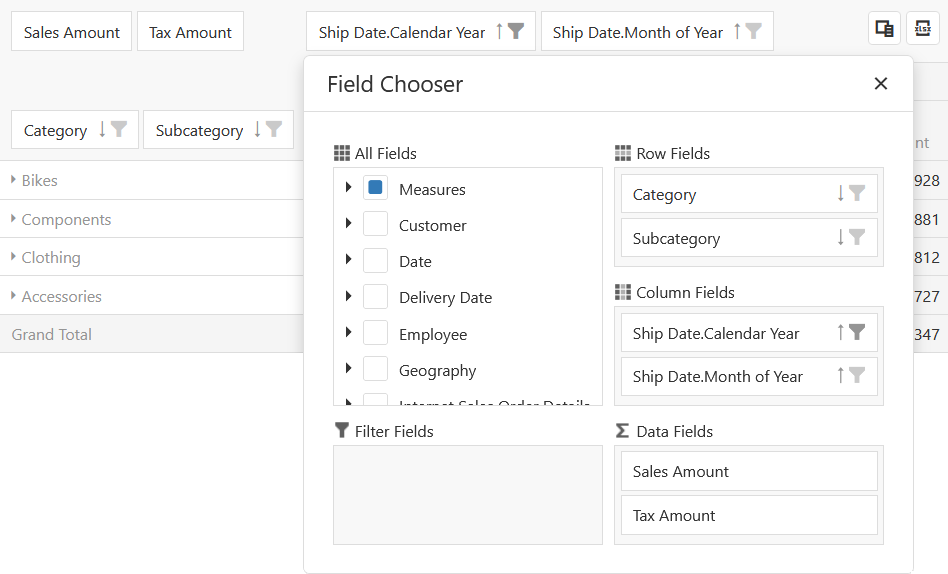
Set the allowSorting property to true to enable this functionality for all fields. You can also set the same property for an individual field if you want to override the common setting.
Use a field's sortOrder property to specify the initial sort order. In the following code, this property is used to sort the Category and Subcategory row field values alphabetically in descending order:
jQuery
$(function() {
    $("#pivotGrid").dxPivotGrid({
        dataSource: {
            // ...
            fields: [{
                dataField: "[Product].[Category]",
                area: "row",
                sortOrder: "desc"
            }, {
                dataField: "[Product].[Subcategory]",
                area: "row",
                sortOrder: "desc"
            },
            // ...
            ],
        },
        allowSorting: true,
    });
});
Angular
// ...
import PivotGridDataSource from 'devextreme/ui/pivot_grid/data_source';

const dataSource = new PivotGridDataSource({
    // ...
    fields: [{
        dataField: "[Product].[Category]",
        area: "row",
        sortOrder: "desc"
    }, {
        dataField: "[Product].[Subcategory]",
        area: "row",
        sortOrder: "desc"
    },
    // ...
    ],
});

// ...
<dx-pivot-grid ...
    [allowSorting]="true">
</dx-pivot-grid>
Vue
import PivotGridDataSource from 'devextreme/ui/pivot_grid/data_source';

const dataSource = new PivotGridDataSource({
    // ...
    fields: [{
        dataField: "[Product].[Category]",
        area: "row",
        sortOrder: "desc"
    }, {
        dataField: "[Product].[Subcategory]",
        area: "row",
        sortOrder: "desc"
    },
    // ...
    ],
});

// ...
<template>
    <DxPivotGrid ...
        :allow-sorting="true">
    </DxPivotGrid>
</template>

<script>
// ...
</script>
React
import PivotGridDataSource from 'devextreme/ui/pivot_grid/data_source';

const dataSource = new PivotGridDataSource({
    // ...
    fields: [{
        dataField: "[Product].[Category]",
        area: "row",
        sortOrder: "desc"
    }, {
        dataField: "[Product].[Subcategory]",
        area: "row",
        sortOrder: "desc"
    },
    // ...
    ],
});

// ...
// ...
export default function App() {
    return (
        <PivotGrid ...
            allowSorting={true}>
        </PivotGrid>
    );
}
Sort Field Values by Summary Values
Users can sort field values by totals and grand totals of the opposite dimension. For instance, to sort column field values, users should right-click a row field value and select one of the commands from the context menu:
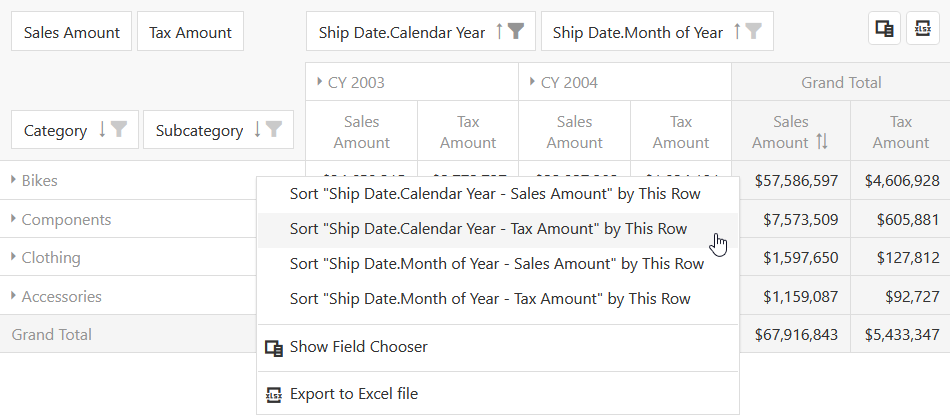
Set the allowSortingBySummary property to true to enable this functionality for all fields. You can also set the same property for an individual field if you want to override the common setting.
To sort field values by grand totals, set the sortBySummaryField property to a data field used for sorting. If you want to sort field values by totals, you should also specify the sortBySummaryPath property. To control the sort order, use the sortOrder property.
In the following code, the Category and Subcategory row field values are sorted by Sales Amount grand total values in descending order:
jQuery
$(function() {
    $("#pivotGrid").dxPivotGrid({
        dataSource: {
            // ...
            fields: [{
                dataField: "[Product].[Category]",
                area: "row",
                sortBySummaryField: "[Measures].[Sales Amount]",
                sortOrder: "desc"
            }, {
                dataField: "[Product].[Subcategory]",
                area: "row",
                sortBySummaryField: "[Measures].[Sales Amount]",
                sortOrder: "desc"
            },
            // ...
            ],
        },
        allowSortingBySummary: true,
    });
});
Angular
// ...
import PivotGridDataSource from 'devextreme/ui/pivot_grid/data_source';

const dataSource = new PivotGridDataSource({
    // ...
    fields: [{
        dataField: "[Product].[Category]",
        area: "row",
        sortBySummaryField: "[Measures].[Sales Amount]",
        sortOrder: "desc"
    }, {
        dataField: "[Product].[Subcategory]",
        area: "row",
        sortBySummaryField: "[Measures].[Sales Amount]",
        sortOrder: "desc"
    },
    // ...
    ],
});

// ...
<dx-pivot-grid ...
    [allowSortingBySummary]="true">
</dx-pivot-grid>
Vue
import PivotGridDataSource from 'devextreme/ui/pivot_grid/data_source';

const dataSource = new PivotGridDataSource({
    // ...
    fields: [{
        dataField: "[Product].[Category]",
        area: "row",
        sortBySummaryField: "[Measures].[Sales Amount]",
        sortOrder: "desc"
    }, {
        dataField: "[Product].[Subcategory]",
        area: "row",
        sortBySummaryField: "[Measures].[Sales Amount]",
        sortOrder: "desc"
    },
    // ...
    ],
});

// ...
<template>
    <DxPivotGrid ...
        :allow-sorting-by-summary="true">
    </DxPivotGrid>
</template>

<script>
// ...
</script>
React
import PivotGridDataSource from 'devextreme/ui/pivot_grid/data_source';

const dataSource = new PivotGridDataSource({
    // ...
    fields: [{
        dataField: "[Product].[Category]",
        area: "row",
        sortBySummaryField: "[Measures].[Sales Amount]",
        sortOrder: "desc"
    }, {
        dataField: "[Product].[Subcategory]",
        area: "row",
        sortBySummaryField: "[Measures].[Sales Amount]",
        sortOrder: "desc"
    },
    // ...
    ],
});

// ...
// ...
export default function App() {
    return (
        <PivotGrid ...
            allowSortingBySummary={true}>
        </PivotGrid>
    );
}
Filter Data
Users can apply header filters to filter pivot grid fields. To enable this feature, set the allowFiltering property to true. This setting adds filter icons to all headers in the field panel and field chooser. Alternatively, you can set the allowFiltering property to display the icons for individual fields. A click on a filter icon opens a pop-up menu that displays field values for users to select.
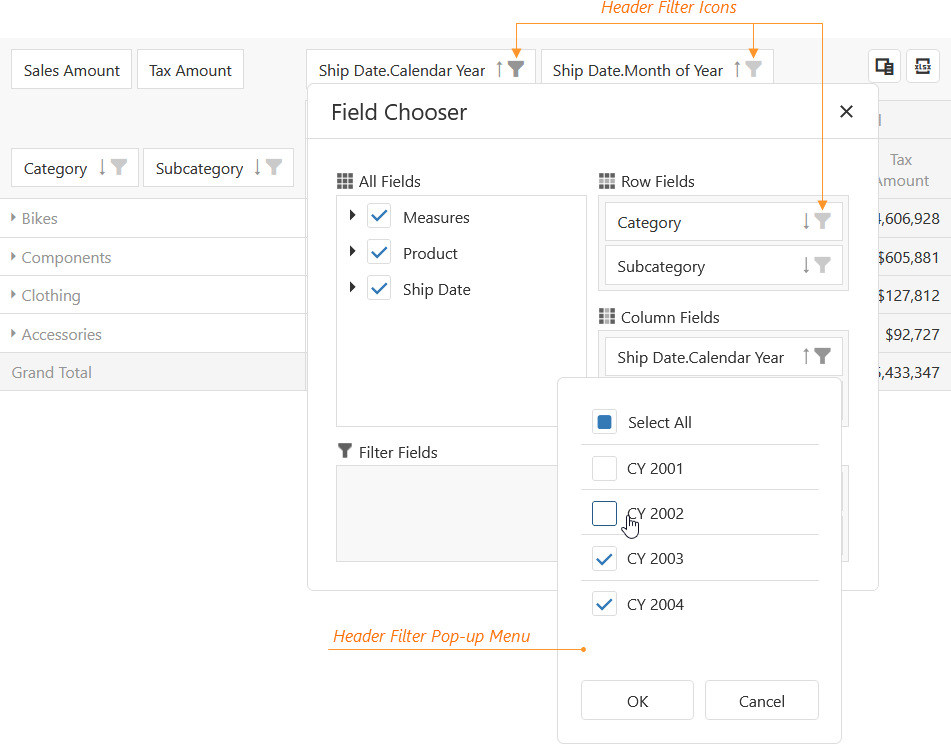
Selected values are saved in a field's filterValues property. You can also set the filterType property to specify whether you want to include (default) or exclude filterValues to or from filter results. In this tutorial, we enable the allowFiltering property and use the filterValues property to initially filter the Calendar Year data field:
jQuery
$(function() {
    $("#pivotGrid").dxPivotGrid({
        allowFiltering: true,
        dataSource: {
            // ...
            fields: [
                // ...
                {
                    dataField: "[Ship Date].[Calendar Year]",
                    area: "column",
                    filterValues: [["CY 2003"], ["CY 2004"]]
                },
                // ...
            ],
        },
    });
});
Angular
// ...
import PivotGridDataSource from 'devextreme/ui/pivot_grid/data_source';

const dataSource = new PivotGridDataSource({
    // ...
    fields: [
        // ...
        {
            dataField: "[Ship Date].[Calendar Year]",
            area: "column",
            filterValues: [["CY 2003"], ["CY 2004"]]
        },
        // ...
    ],
});

// ...
<dx-pivot-grid ...
    [allowFiltering]="true">
</dx-pivot-grid>
Vue
import PivotGridDataSource from 'devextreme/ui/pivot_grid/data_source';

const dataSource = new PivotGridDataSource({
    // ...
    fields: [
        // ...
        {
            dataField: "[Ship Date].[Calendar Year]",
            area: "column",
            filterValues: [["CY 2003"], ["CY 2004"]]
        },
        // ...
    ],
});

// ...
<template>
    <DxPivotGrid ...
        :allow-filtering="true">
    </DxPivotGrid>
</template>

<script>
// ...
</script>
React
import PivotGridDataSource from 'devextreme/ui/pivot_grid/data_source';

const dataSource = new PivotGridDataSource({
    // ...
    fields: [
        // ...
        {
            dataField: "[Ship Date].[Calendar Year]",
            area: "column",
            filterValues: [["CY 2003"], ["CY 2004"]]
        },
        // ...
    ],
});

// ...
// ...
export default function App() {
    return (
        <PivotGrid ...
            allowFiltering={true}>
        </PivotGrid>
    );
}
If you need to customize a header filter's appearance or content, use the global headerFilter object or a field's headerFilter object. Refer to the Header Filter demo for more information:
Export Data to Excel
PivotGrid allows users to export grid data as Excel documents. This feature requires the following third-party libraries:
- DevExtreme ExcelJS v4.4.1+
- FileSaver v2.0.2+
To configure export operations, use the exportPivotGrid(options) method from the excelExporter module. It requires a PivotGrid instance and a target Excel worksheet.
You can call this method at any point in your application. The following code calls it in the PivotGrid's onExporting event handler. In this code, exportPivotGrid(options) exports grid data as a blob that is then saved to an XLSX file. The onExporting event handler is executed when users click the Export button. The export.enabled property adds this button to the PivotGrid.
jQuery
<html>
    <head>
        <!-- ... -->
        <script src="https://cdnjs.cloudflare.com/ajax/libs/babel-polyfill/7.4.0/polyfill.min.js"></script>
        <script src="https://cdn.jsdelivr.net/npm/devextreme-exceljs-fork@4.4.1/dist/dx-exceljs-fork.min.js"></script>
        <script src="https://cdnjs.cloudflare.com/ajax/libs/FileSaver.js/2.0.2/FileSaver.min.js"></script>

        <!-- DevExtreme scripts are referenced here -->
        <!-- ... -->
    </head>
</html>
$(function() {
    $("#pivotGrid").dxPivotGrid({
        export: {
            enabled: true
        },
        onExporting: function(e) {
            const workbook = new ExcelJS.Workbook();
            const worksheet = workbook.addWorksheet('Sales');

            DevExpress.excelExporter.exportPivotGrid({
                component: e.component,
                worksheet: worksheet
            }).then(function() {
                workbook.xlsx.writeBuffer().then(function(buffer) {
                    saveAs(new Blob([buffer], { type: 'application/octet-stream' }), 'Sales.xlsx');
                });
            });
        }
    });
});
Angular
npm install --save devextreme-exceljs-fork file-saver
<dx-pivot-grid ...
    (onExporting)="exportGrid($event)">
    <!-- ... -->
    <dxo-pivot-grid-export [enabled]="true"></dxo-pivot-grid-export>
</dx-pivot-grid>
// ...
import { Workbook } from 'devextreme-exceljs-fork';
import saveAs from 'file-saver';
import { exportPivotGrid } from 'devextreme/excel_exporter';

// ...
export class AppComponent {
    // ...
    exportGrid(e) {
        const workbook = new Workbook();
        const worksheet = workbook.addWorksheet('Sales');
        exportPivotGrid({
            worksheet: worksheet,
            component: e.component
        }).then(function() {
            workbook.xlsx.writeBuffer().then(function(buffer: BlobPart) {
                saveAs(new Blob([buffer], { type: "application/octet-stream" }), "Sales.xlsx");
            });
        });
    }
}
Vue
npm install --save devextreme-exceljs-fork file-saver
<template>
    <DxPivotGrid ...
        @exporting="exportGrid">
        <!-- ... -->
        <DxExport :enabled="true" />
    </DxPivotGrid>
</template>

<script>
import {
    DxPivotGrid,
    // ...
    DxExport
} from 'devextreme-vue/pivot-grid';
import { Workbook } from 'devextreme-exceljs-fork';
import saveAs from 'file-saver';
import { exportPivotGrid } from 'devextreme/excel_exporter';

export default {
    components: {
        DxPivotGrid,
        // ...
        DxExport
    },
    // ...
    methods: {
        exportGrid(e) {
            const workbook = new Workbook();
            const worksheet = workbook.addWorksheet('Sales');
            exportPivotGrid({
                worksheet: worksheet,
                component: e.component
            }).then(function() {
                workbook.xlsx.writeBuffer().then(function(buffer) {
                    saveAs(new Blob([buffer], { type: "application/octet-stream" }), "Sales.xlsx");
                });
            });
        }
    }
}
</script>

<style>
/* ... */
</style>
React
npm install --save devextreme-exceljs-fork file-saver
import React, { useState } from 'react';
import 'devextreme/dist/css/dx.light.css';
import './App.css';

import {
    PivotGrid,
    // ...
    Export
} from 'devextreme-react/pivot-grid';

import { Workbook } from 'devextreme-exceljs-fork';
import saveAs from 'file-saver';
import { exportPivotGrid } from 'devextreme/excel_exporter';
// ...

function exportGrid(e) {
    const workbook = new Workbook();
    const worksheet = workbook.addWorksheet("Sales");
    exportPivotGrid({
        worksheet: worksheet,
        component: e.component
    }).then(function() {
        workbook.xlsx.writeBuffer().then(function(buffer) {
            saveAs(new Blob([buffer], { type: "application/octet-stream" }), "Sales.xlsx");
        });
    });
}

function App() {
    // ...
    return (
        <PivotGrid ...
            onExporting={exportGrid}>
            {/* ... */}
            <Export enabled={true} />
        </PivotGrid>
    );
}

export default App;For further information on the PivotGrid component, refer to the following resources:

 Select one or more answers